 Younès Benallal
How to Add Chatbot in WordPress: Quick and Easy Way
Updated on August 11, 2025Imagine having a virtual assistant that can engage with your website visitors 24/7. It could answer their questions, guide them through your products or services, and even capture leads. That's the power of chatbots. Adding one to your WordPress site is now simpler than ever.
In this article, we'll look at it using Typebot. Typebot is a chatbot builder that lets you create advanced conversational apps visually, with no coding needed. It's time to change the way you interact with your audience, boost engagement, and increase conversions for your business.
How to Install a Chatbot on Your WordPress Site
Benefits of Having a Chatbot on Your WordPress Site
- 24/7 Availability: Unlike humans, chatbots don’t need to sleep. They’re always ready to assist visitors, ensuring every inquiry is addressed.
- Instant Answers: People want quick responses. A chatbot provides instant answers to common questions, guiding visitors through your site without delays.
- Lead Generation: Chatbots can engage visitors, gather information, and qualify leads. This makes your sales team’s job easier.
- Cost-Effective: Hiring a customer service team can be expensive. A chatbot is a cost-effective solution, managing many interactions without high costs.
Now, let's talk about Typebot, the chatbot builder that will simplify your life.
Overview of Typebot’s Feature-Rich Platform
Typebot is like a Swiss Army knife for chatbot builders, packed with useful features:
- Drag-and-Drop Interface: No coding needed! Use Typebot’s visual builder to create chatbots by dragging and dropping elements like text bubbles, input fields, and buttons.
- Conditional Logic: Create branching conversations based on user input. This allows for personalized experiences that feel like one-on-one conversations.
- Integrations: Connect to your favorite apps and services. Use advanced AI like OpenAI to make your chatbot smarter.
- Customizable Theming: Ensure your chatbot matches your WordPress site’s design. Customize colors, and branding elements for a cohesive look.
Is It Possible to Install the Chatbot Without Technical Knowledge?
Absolutely! Typebot is designed for non-technical users. If you can navigate WordPress, you can set up your chatbot. Installing it is as easy as adding a plugin and following simple steps.
Step-by-Step Guide to Add Chatbot in WordPress Using Typebot
Install and Activate Typebot Plugin
First, let's get the Typebot plugin onto your WordPress site. You can download it here. Or from your Wordpress dashboard:
-
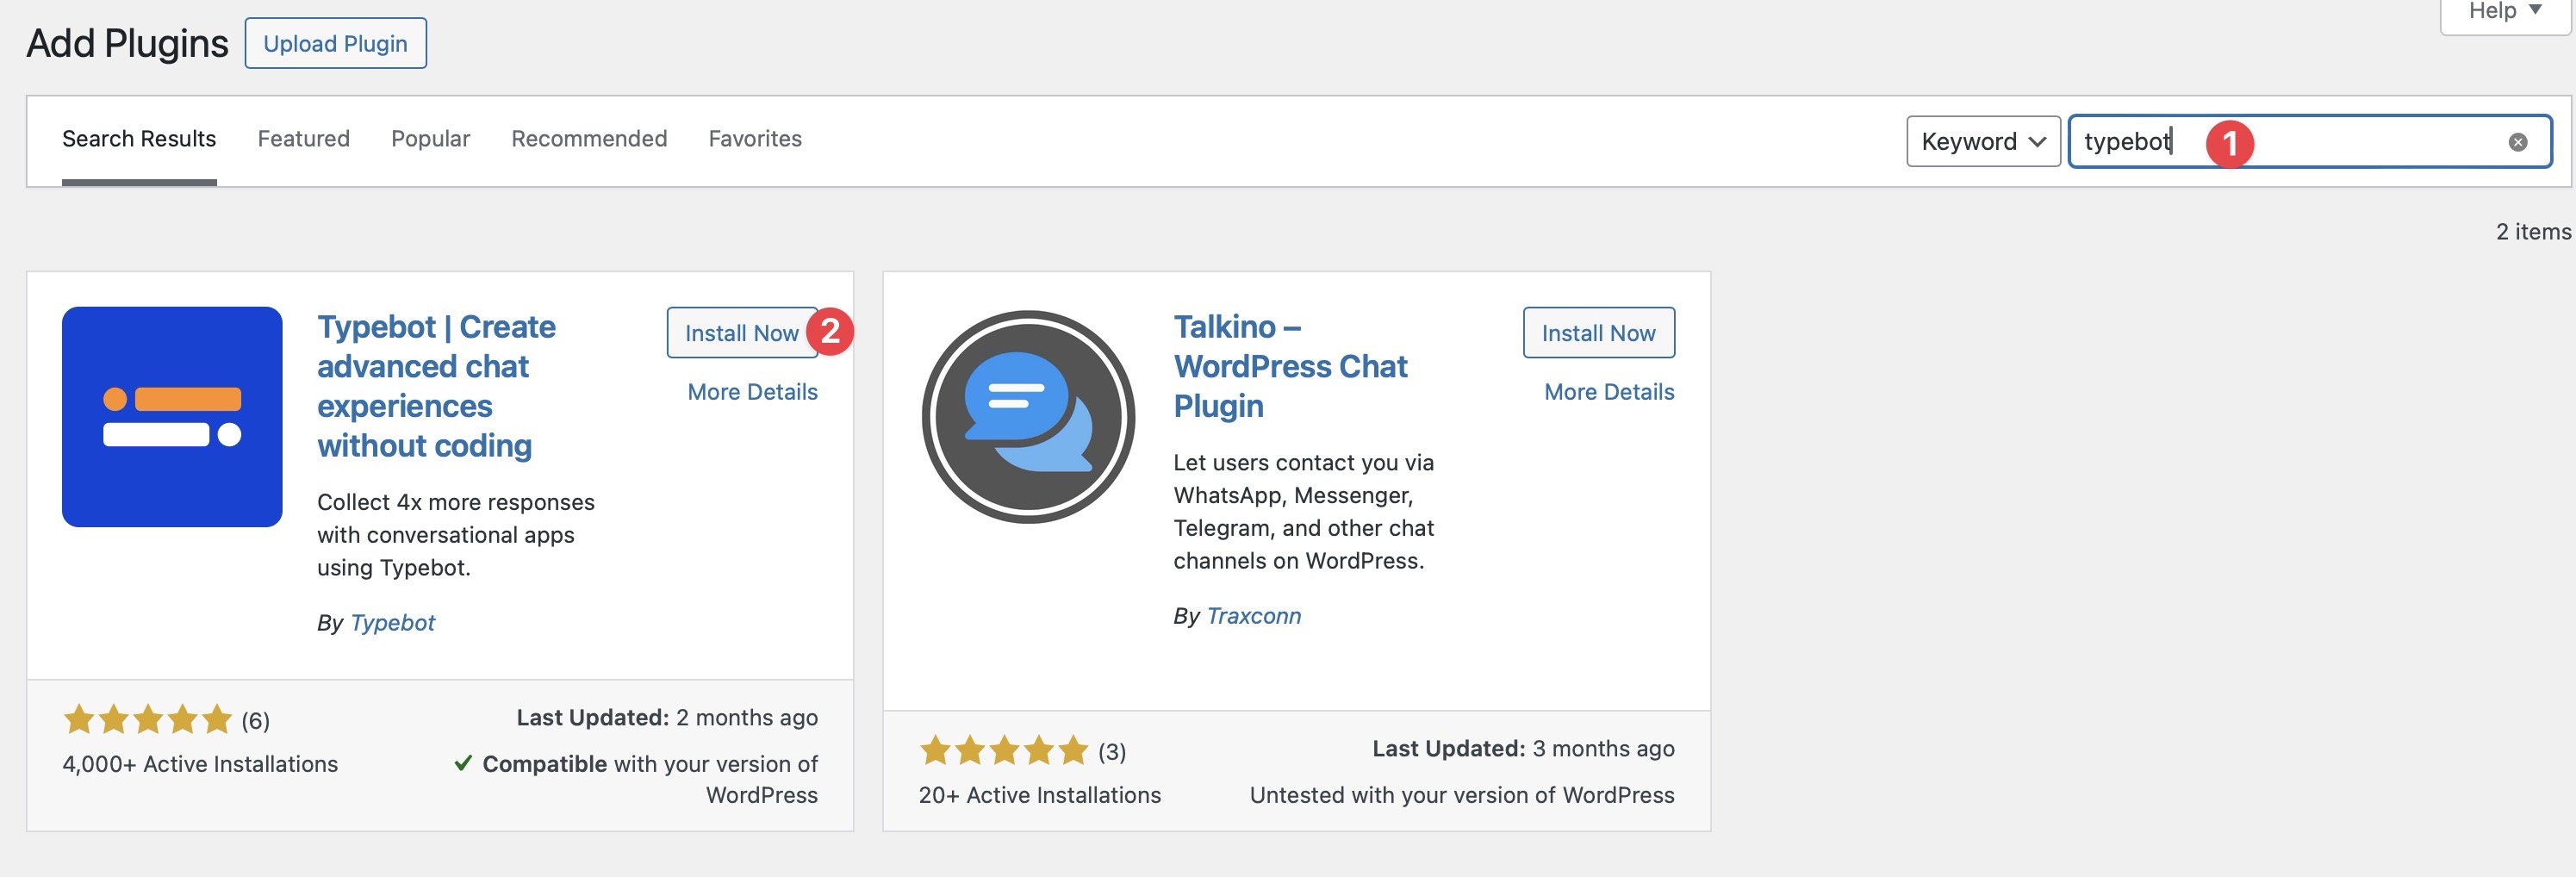
Head Over to the WordPress Plugin Directory: Go to the WordPress admin area. Navigate to Plugins > Add New.

-
Search for Typebot: Type “Typebot” in the search bar. Click “Install Now” once you find the official Typebot plugin.
-
Activate the Plugin: After installation, click the “Activate” button. Typebot will now appear in your WordPress menu.

With the plugin activated, you're ready for the next steps.
Want to compare more ways to collect leads and engage visitors? Check out our in-depth guide on the best contact form plugins for WordPress to see how chatbots stack up against traditional forms.
Configuring Basic Chatbot Settings
Next, let's tailor the chatbot to your needs:
-
Access Typebot Settings: In the WordPress admin area, go to Settings > Typebot.

-
Log In to Your Typebot Account: If you don’t have an account, create one now. After logging in, either create a new Typebot or open an existing one.
-
Generate a Code Snippet: Click on “Share” within Typebot. Select “WordPress” and click the "Get Code Snippet" button to generate your unique code.

-
Paste the Code into WordPress: Copy the snippet and paste it into the “Code Snippet” field in the Typebot settings on your WordPress site. Don’t forget to put ‘0.2’ in the Library version.

Now you’re set with the basics. But there’s more. Typebot offers extensive options for customization to make your chatbot exactly how you envision it.


No trial. Generous free plan.
Designing and Customizing Your Chatbot
Using Typebot's Drag-and-Drop Interface
Creating a chatbot should be as simple as dragging and dropping elements into place—like arranging pieces of a puzzle. That's precisely what Typebot offers. With its intuitive drag-and-drop interface, you can assemble your chatbot visually. No coding, no headaches. Just click and configure the building blocks to create a conversational flow that suits your needs.
Adding Various Conversational Elements
A one-note chatbot can be as engaging as a brick wall. To keep your visitors interested, you need variety. Typebot allows you to add:
- Text Bubbles: Use these to create engaging dialogue and convey your chatbot’s personality and message.
- Input Fields: Collect valuable information with fields for text, email, phone numbers, and buttons for quick responses.
- Buttons and Quick Replies: Enhance interactivity with buttons for users to make selections without typing.

With these elements, your chatbot can gather user data, provide information, and offer a richer experience.
Setting Up Conditional Logic and Integrations
Ever wished your chatbot could respond differently based on user input? With Typebot, it can. Using conditional logic, you can set up your chatbot to:
- Provide personalized responses.
- Redirect the user based on their choices.
- Trigger specific functions depending on the collected data.
Additionally, Typebot integrates with leading platforms like OpenAI and Google Sheets. Need to send data to a spreadsheet or fetch information from a webhook? Typebot covers all these needs.
Want a deeper dive into chatbot integration, customization, and advanced use cases? Click to read our comprehensive guide: How to Add a Chatbot to Your Website.
Embedding the Chatbot into Your WordPress Site
Customizing the Chatbot’s Appearance to Match Your Site’s Theme
The look and feel of your chatbot should blend seamlessly with your website’s aesthetic. Typebot offers easy theming options:
- Color Schemes: Match your chatbot’s colors with your brand palette.
- Avatar and Icons: Personalize your chatbot’s avatar to reflect your brand personality.
With a cohesive appearance, your chatbot will enhance user experience without feeling like an add-on. Go over the Theme tab to customize your Typebot. If you need help, you can check out the documentation.
Can the Chatbot Be Embedded on Specific Pages Only?
Absolutely! You can customize where your chatbot appears:
- Excluded Pages: In the Typebot WordPress settings, use the “Excluded Pages” input to specify where you don’t want the chatbot to appear. For example:
/app/*excludes all pages starting with/app/./appexcludes only the/apppage.
- Conditional Embedding: Set conditions for pages with specific parameters. For instance,
/app?param=1excludes the/apppage only if theparamquery parameter is set to 1.
By controlling which pages feature your chatbot, you ensure it enriches the user experience without being intrusive. Up next, we’ll dive into best practices to make your chatbot as effective as possible.
Testing the Chatbot for Functionality and Responsiveness
Before launching your chatbot, make sure it performs flawlessly. Here’s your checklist:
- Interactions: Test all conversational flows to ensure responses are accurate and timely.
- Responsiveness: Verify that the chatbot looks and works great on all devices—desktop, tablet, and mobile.
- Integrations: Ensure all integrated functionalities like webhooks and data collection are operational.
This testing phase guarantees a stellar user experience from the get-go.
Best Practices for Effective Use of Chatbots
Tips to Increase User Engagement
A chatbot's success hinges on engaging your users. Here are some strategies to make your chatbot irresistible:
- Personalization: Use prefilled variables to tailor responses based on user data. For instance, greeting users by their names makes interactions warmer and more human-like. You can also use AI to customize the chatbot with your data.
- Quick Replies: Speed up conversations with buttons for common responses, actions, or links. This reduces friction and keeps users engaged.
- Interactive Elements: Incorporate images, GIFs, or short videos to liven up your chatbot’s responses and retain user interest.
More strategies in our chatbot best practices guide.
Common Pitfalls to Avoid
Even the best chatbots can falter. Steer clear of these common mistakes:
- Overloading with Options: Too many choices can overwhelm users. Keep it concise and straightforward.
- Robotic Language: Avoid stiff, impersonal language. Aim for natural, conversational tones to make interactions feel human.
- Ignoring Feedback: Users' feedback is gold. Use it to refine and enhance your chatbot's performance.
Measuring the Success of Your Chatbot
How do you know your chatbot is hitting the mark? Track and analyze these key metrics:
- User Interaction Rates: Monitor how many users are engaging with your chatbot and how often.
- Conversation Completion: Track how many users reach the end of a conversation or complete the intended action.
- User Satisfaction: Incorporate surveys or ask for feedback to gauge user satisfaction and areas for improvement.
You can use the Analytics section of the Typebot app to get all these data.
How to Update and Maintain Your Chatbot Regularly?
A chatbot isn't a set-it-and-forget-it tool. Regular updates and maintenance are crucial. Here's how to keep your chatbot in top form:
- Review Interactions: Frequently go through chat logs to identify and address any recurring issues or common questions.
- Update Content: Keep responses relevant by updating product information, FAQs, or other details regularly.
- Test Integrations: Ensure all integrations with platforms like Google Sheets and webhooks are functioning correctly.
Regular updates and maintenance will keep your chatbot a valuable, effective tool for your WordPress site.
No trial. Generous free plan.