 Younès Benallal
Add Chatbot to Webflow: Easy Integration Guide Without Code
Transform your static Webflow site into an interactive, AI-powered customer service hub. By adding a chatbot to Webflow, you revolutionize how you engage with visitors.
This guide will walk you through integrating Typebot, a versatile chatbot builder, into your Webflow site. Whether you want a subtle chat bubble or a full-screen conversational experience, we've got you covered.
Integrating Typebot with Webflow
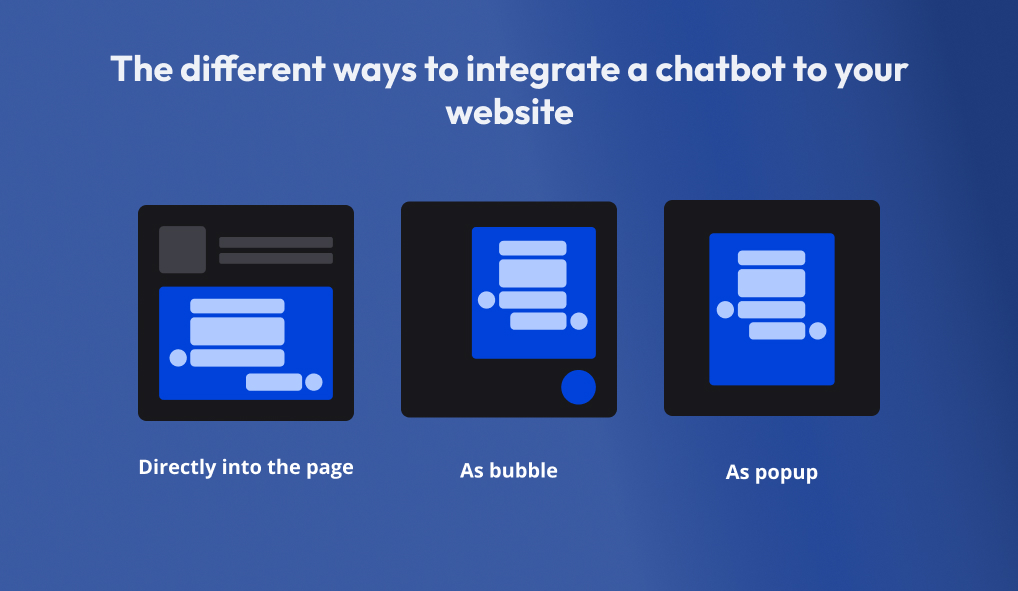
Typebot offers flexibility in enhancing your Webflow site with conversational capabilities. You have three distinct integration methods:
-
Standard Integration: Embed Typebot directly into a container on your Webflow page. This approach makes the chatbot a prominent, always-visible feature. It’s perfect for dedicated landing pages or support sections where immediate engagement is crucial.
-
Bubble Integration: Place a small chat icon in the bottom right corner of your site. This unobtrusive option lets visitors initiate conversations at their convenience without disrupting your page's design. It’s great for maintaining a clean aesthetic while providing easy access to support.
-
Popup Integration: Trigger the chatbot based on specific user actions or time-based events. This method is powerful for lead generation or targeted messaging. Customize when and how the chatbot appears to different audience segments.
Each method serves a unique purpose and can be tailored to fit your specific goals. Your choice depends on factors like your site's design, the chatbot's primary function, and how you want to guide your visitors’ journey through your Webflow site.
Step-by-Step Guide to Embedding Typebot in Webflow
Integrating Typebot into your Webflow site starts in your Typebot dashboard. Navigate to the 'Share' tab of your bot here. You'll find all the necessary information for embedding your chatbot across various platforms, including Webflow.
In the 'Share' tab, look for the Webflow button. Clicking this reveals the specific embed instructions for Webflow integration.
Typebot's instructions involve copying a snippet of code and pasting it into the appropriate section of your Webflow project. This code snippet brings your Typebot to life on your Webflow pages.
Adding Custom Code to Webflow: Step-by-Step Guide
To easily integrate a chatbot into your Webflow site, follow these steps:
-
Log in to your Webflow account and open your project.
-
In the top navigation bar, click on "Settings" You can access them directly from your dashboard as well:

-
In the left sidebar of the Settings page, select "Custom Code"

-
Scroll down to the "Footer Code" section. This is where you'll add the global custom code for your chatbot.
-
Copy the code snippet provided by Typebot for your chosen integration method (standard embed, bubble, or popup).
-
Paste the copied code into the "Footer Code" field in Webflow.
-
Click "Save Changes" at the bottom of the page to apply the custom code to your entire Webflow site.
-
Return to your project's pages and ensure the chatbot appears where intended.
-
Then, publish your Webflow site to make the changes live.
By following these steps, you can easily add custom code for your Typebot chatbot to your Webflow site, regardless of your technical expertise.

No trial. Generous free plan.
Customizing Your Typebot Integration
After pasting the embed code, you're not limited to a default appearance. Typebot offers various customization options within the Webflow interface. You can adjust the size, position, and trigger events for your chatbot. This ensures it aligns perfectly with your site's design and user experience goals.
Testing Your Integration
Before publishing your updated Webflow site, thoroughly test the Typebot integration. Preview your site and interact with the chatbot as a visitor would. This step helps you catch any potential issues and ensures the bot functions as intended across different devices and screen sizes.
If you're looking to add a popup contact form to your Webflow site, check out this guide on adding a popup contact form with Typebot.
Advanced Customization Options
Typebot's integration with Webflow offers advanced customization options. These features let you control how and when your chatbot interacts with visitors, boosting engagement and conversion rates.
Triggering Typebot Commands on Button Clicks
You can trigger specific Typebot commands when a user clicks a button on your Webflow site. This feature allows seamless blending of your site's design with interactive chatbot functionality.
To implement this:
- Assign a unique ID to the button you want to use as a trigger in the Settings tab of your button element in Webflow.
- Modify the Typebot embed script to include an event listener for the button click.
Example script:
<script type="module">
  import Typebot from 'https://cdn.jsdelivr.net/npm/@typebot.io/js@0/dist/web.js'

  Typebot.initPopup({
    typebot: 'my-typebot',
  })

  document.getElementById('BUTTON_ID').addEventListener('click', (event) => {
    event.preventDefault()
    Typebot.open()
  })
</script>
Replace 'BUTTON_ID' with the actual ID you assigned to your button in Webflow.
Multiple Button Triggers
You can add multiple event listeners to trigger the chatbot from different elements on your page. Here’s how to set up two buttons:
<script type="module">
  import Typebot from 'https://cdn.jsdelivr.net/npm/@typebot.io/js@0/dist/web.js'

  Typebot.initPopup({
    typebot: 'my-typebot',
  })

  document.getElementById('BUTTON_ID_1').addEventListener('click', (event) => {
    event.preventDefault()
    Typebot.open()
  })

  document.getElementById('BUTTON_ID_2').addEventListener('click', (event) => {
    event.preventDefault()
    Typebot.open()
  })
</script>
Customizing Chatbot Appearance
Typebot provides extensive theming options. You can customize colors, fonts, button styles and more directly within the Typebot interface. These changes automatically reflect in your Webflow integration.

Advanced Interaction Options
Beyond opening the chatbot, Typebot offers other commands. You can programmatically:
- Send messages to the chatbot
- Close it
- Toggle its visibility based on user actions or page events
- Integrate it in WhatsApp
How to Integrate an AI Chatbot like ChatGPT?
Typebot's integration allows you to incorporate advanced AI models like ChatGPT into your Webflow site. This powerful combination can transform user interactions by providing dynamic, intelligent responses to complex queries.
Setting Up OpenAI Integration
To integrate an AI chatbot, use Typebot's OpenAI block. This feature creates chat completions based on user queries and displays AI-generated answers within your Typebot flow.
Configuring the OpenAI Block
The OpenAI block in Typebot includes a message type called Dialogue. This feature allows you to pass a sequence of saved assistant and user message history to OpenAI, maintaining conversation context.
Setup steps:
- Create a new OpenAI block in your Typebot flow.
- In the block settings, locate the "Messages sequence" section.
- Add alternating user and assistant messages to provide context for the AI.
Leveraging OpenAI Assistants
For even more advanced AI interactions, integrate with OpenAI's Assistants. This feature enables you to create persistent, context-aware AI agents that handle complex tasks and maintain conversation history.
To use an OpenAI Assistant:
- Create an "Ask assistant" action in your Typebot flow.
- Provide the Assistant ID.
- Set up a Thread ID variable to maintain conversation history
If you're interested in training your own chatbot on your data, be sure to check out the guide on Typebot's blog. It covers the process of creating a custom chatbot that can engage with your users in a more personalized and context-aware way.
Ready-to-use Webflow Chatbot Templates
Typebot offers various pre-built templates to streamline adding a chatbot to your Webflow site. These templates cater to various business needs and can easily be customized to match your brand's voice and goals.
Marketing Templates
For lead generation, Typebot provides several marketing-oriented templates:
- Lead Generation: Capture visitor information and qualify leads.
- Quiz: Engage visitors with interactive quizzes to segment your audience or provide personalized recommendations.
- Lead Scoring: Automatically score leads based on their responses, helping you prioritize follow-ups.
- Lead Magnet: Offer valuable content in exchange for contact information.
Product-focused Templates
Showcase products or provide product-related assistance with these templates:
- Product Recommendation: Guide customers to the right product based on their preferences and needs.
- Insurance Offer: For insurance companies to gather relevant information and provide quotes.
- Savings Estimator: Help potential customers understand the value of your product or service by estimating potential savings.
Customer Support Templates
Enhance customer support capabilities with these templates:
- FAQ: Present frequently asked questions interactively, allowing customers to find answers quickly.
- User Onboarding: Guide new users through your product or service features.
- NPS Survey: Gather valuable feedback about customer satisfaction and loyalty.
AI-Enhanced Templates
Leverage AI in your Webflow chatbot with these options:
- Basic ChatGPT: Simple implementation of OpenAI's language model for general conversational capabilities.
- Audio ChatGPT: Combine voice input with AI responses for a more interactive experience.
Specialized Templates
For unique use cases, Typebot offers templates like:
- Digital Product Payment: Streamline the purchase process for digital products directly through the chatbot.
- Movie Recommendation: Engage visitors with personalized movie suggestions based on their preferences.
Conclusion
With Typebot's versatile integration options, advanced AI capabilities, and ready-to-use templates, you can quickly implement a chatbot tailored to your needs.
This provides a seamless, interactive experience for your visitors. By integrating a chatbot, you position yourself at the forefront of web experiences, ready to adapt to future advancements in conversational AI.
No trial. Generous free plan.